spy dna

Run! It's the cops!

Stealth missions usually revolve around you not being noticed or identified as trespasser by the civilian NPCs around you, but what happens if they do?

He’s ready.

A regular civilian NPC such as a researcher, office worker, or even a building night guard would pose absolutely no challenge to a Spy DNA agent, which would make missions boring. To help up the ante a bit, we’ve added the police.

The “police” NPCs will have a non-zero “combat tactics” skill, and depending on their experience level they’ll have other relevant skills, such as Pistols or Observation, to name a couple. This will make them more formidable opponents than your typical night guard. They will also arrive at the scene expecting trouble and will definitely carry weapons.

“You’re under arrest!”

When civilian NPCs see something that we’ve defined as crime (picking a lock, using specific items, being in restricted areas, etc.) or if they see something that would hint at criminal activity (an unconscious body for example), they won’t go after the perpetrators or investigate the crime themselves, they’ll call the cops instead.

When the NPC “calls the cops” we start a countdown until the police units are spawned on the map. How soon they arrive depends on how remote an area is, among other things.

We’re playing super-spies, so when the Police Dispatcher activates the response units, your character will pick that up on their police scanner. The dispatcher will state how far out the response units are at regular intervals, to give you an idea of how urgently you need to get your character out of the area.

On stealth missions, getting arrested by the police will result in mission failure, as will shooting any civilians, so our heroes should ideally clear out before the law enforcement officers show up.

Spy DNA has been Greenlit on Steam!

We've made it! In under two weeks, actually.

Alex has always considered thirteen (along with other primes) to be a lucky number. And it sure was a lucky number of days for us to get the Greenlight thumbs-up.

Thank you everyone for voting and for being our supporters as we work on getting Spy DNA ready for you.

Next stop: Early Access. We're shooting for Q2 this year. For now, there's a bunch of paperwork and prep work on Steam, and of course a lot of coding. We'll announce the Early Access launch date when we know it ourselves.

Stay tuned!

Demo prep

We are getting ready for the demo. Today we made a new video from the latest build. This is the first time we’ve shown a play-though from character creation to combat. We’ve been focused on playability over the last few weeks, so we’re fixing lots and lots of smaller issues.

The big task was working through issues with load and save of games. Because the demo takes you through character creation before you can start taking sample missions, we wanted players to be able to save a character they generated. We also implemented a loading screen while working on load game. We hope these additions make the demo more enjoyable for players.

Another significant change from our previous videos is an updated camera system. While watching people play, we found players used three camera positions frequently. So we added direct support for the most common camera uses. 

  • A low camera which shows things from the view of the character
  • A high camera which shows the tactical situation
  • A target camera which flies the camera over to the active target
  • And we still have “free” camera so the player can move it around as they desire

For the low and high camera they save the player's view height and angle so if you switch away and come back you won’t have to reset the camera each time.

We also implemented a compass; it shows which way the character is facing. More interestingly, we also added contact ticks to the compass. So you can see which way contacts are relative to your active character. Also you can click them to fly the camera over to any contact.

The map generation has been heavily tested and we have recently implemented a number of performance enhancements. Currently the large maps can strain some mid-range systems so we put some effort into improving performance. There is more to be done, but we got a very nice performance bump for the demo.

For the playable characters we doubled the number of commander appearances available for the demo. There are two male and two female commanders to choose from, each with their three outfits depending on mission. There will be many more for the shipping game.

The demo will also include default genetic enhancements for all the playable characters. You will get to see a small example of the enhancements in action. In the shipping game you will be able to select and choose how your commander is enhanced to mirror your play style.

We implemented new shaders for the trees, firing range, roof of the base, and a few other items. This was done to make them more friendly to the camera so they cut or blur away so you can continue to see the most important parts of the map.

The status screen has been updated to show not only injuries, but also attacks which were stopped by armor or implants. You can mouse over any hit and see the force and type of attack along with how much of it any armor you may have stopped. 

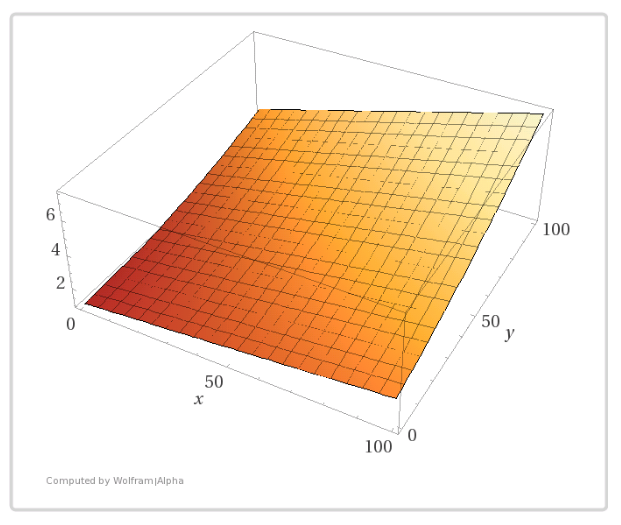
Movement was reviewed. and walk, jog, and sprint speeds were double checked for the demo. We spent a bit of time graphing the various movement speeds vs attributes. These are the base speeds with zero encumbrance.

Walk speed graph

Jog speed graph

Sprint speed graph

The jog (max sustained movement speed) graph is 3D because it’s based off both quickness and stamina. This was triggered when we picked up a few too many weapons at the firing range and unintentionally tested our encumbrance system.

Barring any unexpected problems we expect to have the demo out this month. Stay tuned!

Realistic weapons in Spy DNA: How deep does this rabbit hole go?

As we’ve been known to say on more than one occasion, we want Spy DNA combat to feel very realistic, and by extension this means that the weapons also need to work like you’d expect them to in real life.

On one hand, weapons need to work realistically, in the sense that they should have a range and damage specifications similar to the ones in real life. Sniper rifles are best used at ranges over 100 meters (and we’ll make sure there are maps big enough for that to matter), and handguns are a good choice for concealed weapons or closed-quarters combat, where you’d have difficulty wielding a long-barreled assault rifle.

If you’ve been following us for a while, you know that that’s a given, and a premise of our whole game, really. When we set out to build Spy DNA, we wanted to provide the player with as realistic a combat simulation as possible, while still making it a game.

The main implication is that the realism makes for a slightly different set of perks and challenges than a typical shooter. We want for the player to be able to use the common sense and knowledge of how things work in the real world to navigate the game. Basically, if you think doing something would get you (or the opponent) hurt or killed in the real world, it should be the same in Spy DNA. Case in point, head shots. Best to avoid them. Or land them on your enemies.

Just like the real deal (P25 dart pistol)

But on top of that, the weapons also need to look the part. If we gave our soldiers guns that look like they’d be hard to get through an ordinary doorway, or were too heavy to even lift, the realism and the immersion go out the window. Don’t get me wrong folks, there ain’t a thing in the world wrong with games that do that, but it’s just not where we chose to take Spy DNA.

The little screen on the back shows ammo levels and other useful info to the shooter

So while designing the weapons, working together, Jason, Denis and I have been periodically taking a step back to check whether the weapon still looks usable, practical, and like something that you could imagine the military of 2075 using. You could overhear us having conversations about making sure that we don’t eject brass into the user’s face or hands, or make the shiny trim reveal the position of our sniper.

We put a lot of thought into the ammo feed position, grips, and how easy would it be to reload or unjam in a firefight, what accessories the owner may want to add and where, and so on. Denis put immense attention to detail into each weapon, and as a result we have game guns in which the sights align when you’re looking at them like you’d be aiming. The fact that it’s a 3rd person game where the player will most likely never see these little details doesn’t mean that we don’t pay attention to them.

Most weapons in our game will have a range of accessories/extensions such as scopes, sights, grips, bipods, and extended ammo clips that the player can choose to equip to add a touch of personalization to their kit.
If our Early Access really takes off, we should have the funds to make more customizable parts for the guns, including rare mods, color schemes, and accessories that can only be gained by completing certain missions.

Stay tuned for the announcement of our Greenlight campaign!

Procedural map generation in Spy DNA

by Jason Sams

It’s been a while since I wrote my last update. I’ve been hard at work on a few things. But as promised in the last update, today we will talk about mission maps.

We have the core of the map generation up and running. We have tested it generating maps from 128 meters square to 2 kilometers.  Map generation times are pretty good; just a few seconds in most cases.  

Procedural map of a wooded rural area with roads and trees

The maps are complete with bushes and trees. We are planning to add grass too, but that is a little harder to do without hurting performance, so it may not make our first Early Access release.

The size of the map will have a large effect on the time a mission takes to complete, and the general flow of a mission. For example, on a small 256 or 128 square meter map, there is no reason to bring any sniper weapons with you on a mission. Most of the regular rifles are “good enough” at those ranges while being much more useful up close.

Closer view of a procedural map, showing transition from sandy to grassy terrain

We understand our players will have a variety of play styles. So we will be adding an option to the settings to adjust the map size to larger or smaller to mirror what you enjoy most. This will apply a +1 or -1 to the map size settings. The supported map sizes are 128, 256, 512, 1024, and 2048 meters. At the default settings all missions will be on maps from 256 to 1024 meters. So applying the +1 would change that to 512 to 2048. 

When you start a mission, you will be able to see all of the terrain. We assume that in the future you'll still have satellites and drones to recon the area before you deploy. Hidden or movable items such as enemy patrols will be hidden by the fog of war until a team member manages to spot them. Once spotted, they will be marked on the map. If you lose contact, the marker will remain at the last position a team member saw them.

With the upcoming demo we will be using the procedural maps to allow the player to generate skirmishes. We want everyone to have a chance to try out our unique combat system and get a feel for the game.

Behind the scenes: How are Spy DNA weapons made?

Hey everyone, and welcome to the second part of our introduction to the workflow for creating the assets. If you haven't read the post about who I am, you can check it out first. Today I wanted to talk about my process for creating the assault rifle for Spy DNA.

Conceptualizing the weapon

The first thing that needs to be done before any actual modeling is the concept. This phase of the project is quite important as it will set the dynamic of the work follows.

Another very important thing when creating a model that doesn't exist in real life is to make it appear functional.

Creating the concept for this weapon started with the basic choice of ammunition feed system. For this gun we chose a bullpup design, which means the clip feed is integrated in the stock.

The next thing that was to provide places for the attachments, such as scope, holo-sights, etc. This meant we would be using threaded rails on the gun for the actual attachments.

Modeling the weapon

So now that we have the concept, or the guidelines for our weapon we can proceed to the modeling phase. This is the phase in which we need to be careful on how our concept will come together. Also this is where we need to make our model scale be in line with a realistic model. The reason why this is important is because we want to make sure the weapon animates well in-game, and that the characters using it will look good doing so.

For the actual modeling I used 3ds Max, and basic polygon modeling techniques. The main goal here was to keep the design guidelines in mind and make it into a complete weapon. After a few different versions and going through a few failed designs I ended up with a base model that the team and myself were happy with.

Now that the basic shape was achieved it was time to add in the fine details like little screws, bolts, rivets, threads and the barrel threading. Once all of this is done, we basically have the high polygon count (high-poly) model for our game.

If you are curious as to how all this works, go ahead and check out my YouTube channel.

Getting the model game-ready

Once we have the high-poly model, we need to make a game-ready (low-poly) model. The process of creating a low-poly model of an existing high-poly model is called retopology.

This is one of the more time-consuming parts of the asset creation. Here you basically need to make the 3D model that can be used in the game engine. This means that you will have a polygon budget that will limit how much detail you can put in your model. If you aren't careful of your budget, you can end up putting a strain on the player's computer, and their framerate will drop, and nobody likes that.

This is how the low-poly model of the SR100 looks underneath the textures.

For this project I did most of my retopology in 3ds Max, but I also used Topogun and 3d Coat. When you're done, you get a low-poly model that has the basic shape, but not the surface details of the high-poly model. Next, we'll need to unwrap it so we can apply textures.

Texturing the model

Once we have an unwrapped model, we can continue to the texturing phase. In this phase first we bake the surface details from the high poly to the game model. This way in the game the weapon will look as if it still had all the little screws, buckles, etc., even though the low-poly model has none of that. 

After this is done we go with the actual application of the materials. I used Substance Painter which is an application for texturing to do the textures for the weapon. With the model done, unwrapped and textured we have the finished model that will be used in the game.

What's next?

If you're still with me, then you were able to get a little taste of what it takes to create a game asset from start to finish.

As we make progress developing Spy DNA, we'll be making more posts like these, so you can look over our shoulders in a way. You will get to hear from the other team members, each talking about their aspects of creating this game.

So for today that would be all from me, and remember to come back and check on our progress often!

-- Denis Keman

Introducing Spy DNA 3D artist

This is a post written by our talented 3D artist Denis Keman. We'll be publishing a series of posts by Denis, which will cover his creative process, and provide insight into how game models are made.

Who am I ?

Hey everybody, my name is Denis Keman. I am a 3D modeler and a 3d generalist. My YouTube channel (Denis Keman - "very creative i know") is all about 3d modeling. I was lucky enough to get a chance to work on the upcoming game Spy DNA. I was hooked on this project because of the old “Jagged Alliance” feel that it had. Then I met the awesome team at Shy Snake Games and we just hit it off instantly. 

Now with that short intro out of the way, i would like to tell you a bit about my workflow. And what i use to do the things i do.

What do i use in my workflow ?

First things first, what you need to know is that 3D work is basically art. To understand it, you need to know the tools that were used. 

In the field of 3D modeling you have a wide array of different tools like Blender, Maya, Rhinoceros, Max etc. All of these are 3D modeling packages, and the one that I use is 3DS Max. I created the high poly and the low poly models in 3ds Max, and texturing was done with Substance Painter. 

If you are not a 3D modeler, you might ask what’s the difference between high and low poly model. Well it's basically two models with different levels of detail for the same thing. The idea is to get the high poly details onto the low poly model (the one you see in game). That way you get a good-looking model that doesn’t eat up all of your system resources when it’s rendered in-game. In order not to get too technical I will leave that for a future post.

The creative process

Getting from point A to point B is not always a straight line, especially in creative work. The first thing that needed to be modeled was the weapons that will be used in-game. The idea here wasn't to simply recreate an existing real-life weapon, but rather to design a unique one. 

The first custom design model was the P-15 handgun. This gun is compact, easy to conceal and carry around. That means that the frame in not bulky and has flowing lines. 

Another thing that i had to keep in mind was the fact that it didn't shoot conventional ammo. Instead it was shooting gun darts, which meant that the barrel had to be different from a conventional firearm. 

Another thing that I had to put into the design was a screen at the back of the gun for showing the shooter their ammo status, firing mode, etc. After going through a few design iterations I ended up with the design you see below.

Summary

Since this is the first blog post from me, I would like to cut it short here. I hope it was fun, and that you enjoyed a glimpse into my design process. You should also have a better idea of what the process behind making a game model looks like now. Next time we will go over how the creation process goes for a different weapon. 

And if you would like to see a more technical look at things, leave a comment down below. Depending on what you’d like to know, I will do my best to explain it. 

For any information about the game hit us up on twitter @ShySnakeGames. And don't forget to share this around so more people can hear about Spy DNA. Remember folks, sharing is caring.

So that would be it for now. I will see you all next time.
-- Denis Keman

Base level preview

Wanting to take advantage of the great outdoors rendering capabilities of Lumberyard, we've "moved" the Spy DNA base to a small island, which can only be reached by sea or air. The island will also feature a helicopter landing pad and an extensive training facility for the Spy DNA agents to use between missions to hone their superhuman skills.

Here's a screenshot of the pier for you while we're working on the base level.